Di kantor saya menggunakan printer HP Laser Jet 1020. Awalnya saya mengira driver printer ini sudah disupport (built-in) oleh Fedora 11 dengan menggunakan Gutenprint dan tipe printer: HP LaserJet 1010. Biasa kan, kalau linux tidak mengenali tipe terbaru, ya biasanya kita pakai tipe setingkat dibawahnya...
Ternyata ini tidak berhasil ! Perintah printing sudah dikirim namun printer diam saja, tidak menghasilkan apa-apa. Setelah bertanya kepada Windra (salah seorang staff ahli di bidang linux) ternyata untuk HP LaserJet 1020 bukan pakai Gutenprint, tapi foo2zjs. Wah, apalagi ini, langsung saya googling dan ketemu. Ternyata foo2zjs ini adalah driver external (third party) yang secara khusus memuat driver-driver printer HP LaserJet 1020.
Baik, langsung saya kerjakan langkah-langkah berikut ini :
1. Mendownload file drivernya dari Internet. Ambil disini -> http://foo2zjs.rkkda.com/foo2zjs.tar.gz
2. Extract file tersebut dengan menggunakan perintah : tar -zxvf foo2zjs.tar.gz
3. Saatnya kita compilasi source code ini ... dengan mengetikkan : make kemudian make install dan make install-hotplug
4. Restart CUPS dengan mengetikkan : make cups
5. Selesai deh ... tinggal di add lagi di CUPS Web Interfacenya...
Selamat mencoba !
Sunday, December 13, 2009
Friday, December 11, 2009
About IDE, SATA, and SCSI Drives
IDE Drives
To save costs, many small business systems will probably use IDE disks, but they do have some limitations.
- The total length of an IDE cable can be only a few feet long, which generally limits IDE drives to small home systems.
- IDE drives do not hot swap. You cannot replace them while your system is running.
- Only two devices can be attached per controller.
- The performance of the IDE bus can be degraded by the presence of a second device on the cable.
- The failure of one drive on an IDE bus often causes the malfunctioning of the second device. This can be fatal if you have two IDE drives of the same RAID set attached to the same cable.
For these reasons, I recommend you use only one IDE drive per controller when using RAID, especially in a corporate environment. In a home or SOHO setting, IDE-based software RAID may be adequate.
Serial ATA Drives
Serial ATA type drives are rapidly replacing IDE, or Ultra ATA, drives as the preferred entry level disk storage option because of a number of advantages:
- The drive data cable can be as long as 1 meter in length versus IDE's 18 inches.
- Serial ATA has better error checking than IDE.
- There is only one drive per cable which makes hot swapping, or the capability to replace components while the system is still running, possible without the fear of affecting other devices on the data cable.
- There are no jumpers to set on Serial ATA drives to make it a master or slave which makes them simpler to configure.
- IDE drives have a 133Mbytes/s data rate whereas the Serial ATA specification starts at 150 Mbytes/sec with a goal of reaching 600 Mbytes/s over the expected ten year life of the specification.
If you can't afford more expensive and faster SCSI drives, Serial ATA would be the preferred device for software and hardware RAID
SCSI Drives
SCSI hard disks have a number of features that make them more attractive for RAID use than either IDE or Serial ATA drives.
- SCSI controllers are more tolerant of disk failures. The failure of a single drive is less likely to disrupt the remaining drives on the bus.
- SCSI cables can be up to 25 meters long, making them suitable for data center applications.
- Much more than two devices may be connected to a SCSI cable bus. It can accommodate 7 (single-ended SCSI) or 15 (all other SCSI types) devices.
- Some models of SCSI devices support "hot swapping" which allows you to replace them while the system is running.
- SCSI currently supports data rates of up to 640 Mbytes/s making them highly desirable for installations where rapid data access is imperative.
SCSI drives tend to be more expensive than IDE drives, however, which may make them less attractive for home use.
Replacing A Failed Hard Drive In A Software RAID1 Array
This guide shows how to remove a failed hard drive from a Linux RAID1 array (software RAID), and how to add a new hard disk to the RAID1 array without losing data.
I do not issue any guarantee that this will work for you!
1 Preliminary Note
In this example I have two hard drives, /dev/sda and /dev/sdb, with the partitions /dev/sda1 and /dev/sda2 as well as /dev/sdb1 and /dev/sdb2.
/dev/sda1 and /dev/sdb1 make up the RAID1 array /dev/md0.
/dev/sda2 and /dev/sdb2 make up the RAID1 array /dev/md1.
/dev/sda1 + /dev/sdb1 = /dev/md0
/dev/sda2 + /dev/sdb2 = /dev/md1
/dev/sdb has failed, and we want to replace it.
2 How Do I Tell If A Hard Disk Has Failed?
If a disk has failed, you will probably find a lot of error messages in the log files, e.g. /var/log/messages or /var/log/syslog.
You can also run
cat /proc/mdstat
and instead of the string [UU] you will see [U_] if you have a degraded RAID1 array.
3 Removing The Failed Disk
To remove /dev/sdb, we will mark /dev/sdb1 and /dev/sdb2 as failed and remove them from their respective RAID arrays (/dev/md0 and /dev/md1).
First we mark /dev/sdb1 as failed:
mdadm --manage /dev/md0 --fail /dev/sdb1
The output of
cat /proc/mdstat
should look like this:
server1:~# cat /proc/mdstat
Personalities : [linear] [multipath] [raid0] [raid1] [raid5] [raid4] [raid6] [raid10]
md0 : active raid1 sda1[0] sdb1[2](F)
24418688 blocks [2/1] [U_]
md1 : active raid1 sda2[0] sdb2[1]
24418688 blocks [2/2] [UU]
unused devices:
Then we remove /dev/sdb1 from /dev/md0:
mdadm --manage /dev/md0 --remove /dev/sdb1
The output should be like this:
server1:~# mdadm --manage /dev/md0 --remove /dev/sdb1
mdadm: hot removed /dev/sdb1
And
cat /proc/mdstat
should show this:
server1:~# cat /proc/mdstat
Personalities : [linear] [multipath] [raid0] [raid1] [raid5] [raid4] [raid6] [raid10]
md0 : active raid1 sda1[0]
24418688 blocks [2/1] [U_]
md1 : active raid1 sda2[0] sdb2[1]
24418688 blocks [2/2] [UU]
unused devices:
Now we do the same steps again for /dev/sdb2 (which is part of /dev/md1):
mdadm --manage /dev/md1 --fail /dev/sdb2
cat /proc/mdstat
server1:~# cat /proc/mdstat
Personalities : [linear] [multipath] [raid0] [raid1] [raid5] [raid4] [raid6] [raid10]
md0 : active raid1 sda1[0]
24418688 blocks [2/1] [U_]
md1 : active raid1 sda2[0] sdb2[2](F)
24418688 blocks [2/1] [U_]
unused devices:
mdadm --manage /dev/md1 --remove /dev/sdb2
server1:~# mdadm --manage /dev/md1 --remove /dev/sdb2
mdadm: hot removed /dev/sdb2
cat /proc/mdstat
server1:~# cat /proc/mdstat
Personalities : [linear] [multipath] [raid0] [raid1] [raid5] [raid4] [raid6] [raid10]
md0 : active raid1 sda1[0]
24418688 blocks [2/1] [U_]
md1 : active raid1 sda2[0]
24418688 blocks [2/1] [U_]
unused devices:
Then power down the system:
shutdown -h now
and replace the old /dev/sdb hard drive with a new one (it must have at least the same size as the old one - if it's only a few MB smaller than the old one then rebuilding the arrays will fail).
4 Adding The New Hard Disk
After you have changed the hard disk /dev/sdb, boot the system.
The first thing we must do now is to create the exact same partitioning as on /dev/sda. We can do this with one simple command:
sfdisk -d /dev/sda | sfdisk /dev/sdb
You can run
fdisk -l
to check if both hard drives have the same partitioning now.
Next we add /dev/sdb1 to /dev/md0 and /dev/sdb2 to /dev/md1:
mdadm --manage /dev/md0 --add /dev/sdb1
server1:~# mdadm --manage /dev/md0 --add /dev/sdb1
mdadm: re-added /dev/sdb1
mdadm --manage /dev/md1 --add /dev/sdb2
server1:~# mdadm --manage /dev/md1 --add /dev/sdb2
mdadm: re-added /dev/sdb2
Now both arays (/dev/md0 and /dev/md1) will be synchronized. Run
cat /proc/mdstat
to see when it's finished.
During the synchronization the output will look like this:
server1:~# cat /proc/mdstat
Personalities : [linear] [multipath] [raid0] [raid1] [raid5] [raid4] [raid6] [raid10]
md0 : active raid1 sda1[0] sdb1[1]
24418688 blocks [2/1] [U_]
[=>...................] recovery = 9.9% (2423168/24418688) finish=2.8min speed=127535K/sec
md1 : active raid1 sda2[0] sdb2[1]
24418688 blocks [2/1] [U_]
[=>...................] recovery = 6.4% (1572096/24418688) finish=1.9min speed=196512K/sec
unused devices:
When the synchronization is finished, the output will look like this:
server1:~# cat /proc/mdstat
Personalities : [linear] [multipath] [raid0] [raid1] [raid5] [raid4] [raid6] [raid10]
md0 : active raid1 sda1[0] sdb1[1]
24418688 blocks [2/2] [UU]
md1 : active raid1 sda2[0] sdb2[1]
24418688 blocks [2/2] [UU]
unused devices:
That's it, you have successfully replaced /dev/sdb!
Monday, April 27, 2009
Format Flashdisk di Linux
Seorang rekan kerja bertanya pada saya, bagaimana caranya memformat flashdisk di linux Fedora 6 ? Waduh, saya sempat bingung juga... karena jujur saya tidak pernah menggunakan linux sebelumnya. Namun berhubung saya orang IT, mau gak mau harus bisa memberikan jawabannya. Setelah googling2 di internet, akhirnya ketemu juga. Begini langkah singkatnya :
 1. Lihat dulu flashdisknya sedang terkoneksi pada device mana, gunakan perintah ini : fdisk -l
misal munculnya seperti ini :
Device Boot Start End Blocks Id System
/dev/sda1 1 5923 3944444 b W95 FAT32
maka flashdisk berada di /dev/sda1
2. Unmount dulu flashdisknya dengan perintah : umount /dev/sda1
3. Format dengan perintah : mkfs.vfat -F 32 -n Honggi /dev/sda1
4. Selesai, silahkan diperiksa apakah sudah terformat atau belum.
Ingat ! Semua perintah diatas hanya bisa dikerjakan jika anda berada dalam mode root.
1. Lihat dulu flashdisknya sedang terkoneksi pada device mana, gunakan perintah ini : fdisk -lmisal munculnya seperti ini :
Device Boot Start End Blocks Id System
/dev/sda1 1 5923 3944444 b W95 FAT32
maka flashdisk berada di /dev/sda1
2. Unmount dulu flashdisknya dengan perintah : umount /dev/sda1
3. Format dengan perintah : mkfs.vfat -F 32 -n Honggi /dev/sda1
4. Selesai, silahkan diperiksa apakah sudah terformat atau belum.
Ingat ! Semua perintah diatas hanya bisa dikerjakan jika anda berada dalam mode root.
Tuesday, April 21, 2009
Reset Openfire Admin Password
A. Embedded Database :
==================
cari file : openfire.xml, editlah file itu kemudian carilah bagian yang menyerupai berikut dibawah ini :
honggi
9090
9091
silahkan ditambahkan baris yang berwarna merah, simpan perubahan yang telah dilakukan kemudian restartlah openfire anda.
External Database (MySQL) :
=====================
==================
cari file : openfire.xml, editlah file itu kemudian carilah bagian yang menyerupai berikut dibawah ini :
silahkan ditambahkan baris yang berwarna merah, simpan perubahan yang telah dilakukan kemudian restartlah openfire anda.
External Database (MySQL) :
=====================
1. Login to MySQL and use openfire database. I use the command:mysql -uroot -p openfire
2. Display the password for the admin user with the query:select password from jiveUser where username = 'admin';
This will display the initially chosen password for admin. However if you have at any time changed the password from the administration screen then it will display NULL instead.
After first change the password is encrypted and stored in the encryptedPassword field and cannot be recovered.
However you can change the password even without knowing the original password.
How to change Openfire admin password
Change the admin (or any other users) password by setting password field to chosen value and encryptedPassword field to null. For example here is the query to set the admin password to 123456:update jiveUser set password='123456', encryptedPassword = null where username ='admin';
This will change the current admin password to 123456. Remember to change it to a different value after you login to the admin console. This will also have the side-effect of encrypting your password in database for added security.
Note: Openfire admin console is available at http://localhost:9090
Thursday, April 16, 2009
Membuat Icon Desktop Transparan pada Windows XP / Vista
Terkadang ketika kita mengubah - ubah warna background dari tampilan desktop kita, warna latar belakang tulisan dari icon - icon yang ada di desktop juga ikut berubah sehingga tulisan icon tersebut tidak lagi transparan / mengikuti warna desktop.
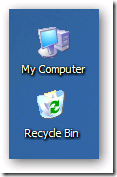
Contoh :

lalu bagaimana caranya untuk menjadikan warna tulisan pada icon tersebut sesuai dengan warna latar belakang desktop seperti yang terlihat pada gambar dibawah ini :
Contoh :

lalu bagaimana caranya untuk menjadikan warna tulisan pada icon tersebut sesuai dengan warna latar belakang desktop seperti yang terlihat pada gambar dibawah ini :

Berikut adalah langkah - langkah yang dapat anda ikuti :
Selamat mencoba !
- Buka Control Panel - System
- Klik pada tab : Advanced
- Pada bagian Performance, klik tombol : Settings
- Pada bagian Visual Effect, centang bagian : Use drop shadows for icon labels on the desktop
- Selesai.
Selamat mencoba !
Thursday, January 15, 2009
File dan Folder Tersembunyi
Ada beberapa jenis virus yang suka sekali menyembunyikan file dan folder sehingga anda tertipu dan menjadi shock / lemas karena pikir anda, file dan folder anda terhapus / HILANG !
Padahal sebenarnya, file dan folder anda masih ada. Ada beberapa settingan registry yang telah dimodifikasi oleh virus, sehingga dengan menggunakan Windows Explorer, anda tidak akan pernah bisa melihat file yang di hidden, serta membebaskan attribut hidden tersebut.
Untuk melihatnya, anda bisa menggunakan Command Prompt, kemudian ketikkan perintah DIR /a:H (perintah DOS untuk melihat file dan folder yang tersembunyi). AHA! File dan Folder anda masih ada kan ? ;-)
Saatnya untuk menampilkan file dan folder anda agar dapat dilihat di Windows Explorer, serta dapat anda bebaskan attributnya (kembalikan dari hidden ke non-hidden)
Buka Registry Editor, cari bagian ini :
- HKEY_CURRENT_USER\Software\Microsoft\Windows\CurrentVersion\Explorer\Advanced
SuperHidden = 1
Setelah dimodifikasi oleh virus, maka akan berubah menjadi :
HKEY_CURRENT_USER\Software\Microsoft\Windows\CurrentVersion\Explorer\Advanced
SuperHidden = 0 - HKEY_CURRENT_USER\Software\Microsoft\Windows\CurrentVersion\Explorer\Advanced
Hidden = 1
Setelah dimodifikasi oleh virus, maka akan berubah menjadi :
HKEY_CURRENT_USER\Software\Microsoft\Windows\CurrentVersion\Explorer\Advanced
Hidden = 0
Kembalikan kondisinya seperti berikut :
Carilah bagian : HKEY_LOCAL_MACHINE\SOFTWARE\Microsoft\Windows\CurrentVersion\Explorer\Advanced\Folder\Hidden\SHOWALL
Lihat pada key yang berbunyi "CheckedValue". Key ini harus berupa/bertipe DWORD. Jika yang anda lihat bukan bertipe DWORD, HAPUS key itu ! Kemudian buatlah sebuah key baru yang bernama "CheckedValue" bertipe DWORD(Hexadesimal) dengan nilai : 1Sekarang, checkbox dalam Folder Options anda akan berfungsi normal kembali.
Untuk mengembalikan attribut file yang terlanjur dihidden oleh virus, gunakan perintah ini :
attrib -r -s -h *.* /S /D (diketikkan pada command prompt, masuk ke root folder)
Subscribe to:
Posts (Atom)